Recipe: Kinche

Kinche

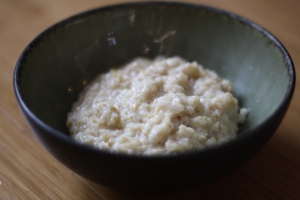
Kinche is a very common Ethiopian breakfast food, their equivalent of oatmeal, if you will.  It’s incredibly simple, inexpensive, and nutritious.  It is made from cracked wheat, which you can find in any grocery store.  You can boil it in either milk, or part milk/part water.  And in Ethiopia, after the kinche is cooked it is mixed in the pan with niter qibe (clarified spiced butter) or oil and fried onions.  Personally, I skip that step, but only because I make the kinche the day beforehand and Adam heats it up for the kids in the morning.  Very un-Ethiopian of us, from both a culinary and gender-role perspective, but I am literally never conscious while the kids are eating breakfast and Adam is kind enough to get up and feed them in my absence, but won’t do much more than make toast or heat milk in the microwave.  So the kinche with fried onions and qibe is out.  But the kids still eat it and like it.  I bet your Ethiopian kids will, too.

Kinche

3/4 cup cracked wheat
3 cups milk (or some combination of milk and water)
niter qibe OR oil and finely chopped onions
salt, to taste

Heat the milk and add the cracked wheat.  Cook on low or low-medium heat, stirring frequently, until the wheat is cooked, about 20-30 minutes.
If using qibe: heat the qibe and stir the kinche to mix thoroughly.  Salt to taste.
If using oil and onions: fry the onions in the oil.  Stir in the kinche and salt to taste.

“Gotcha Day” and other ugliness

I read this essay a week ago via Harlow’s Monkey and have not been able to shake it from my mind ever since.  I’m not going to summarize it here, because it would be impossible to convey the profundity of Jane Jeong Trenka’s essay in short paragraph form.  Go read it for yourself, and come back.

Adoption is a beautiful thing.  Sometimes.  But in many ways, perhaps in even more ways than not, it is complicated, tragic, and ugly.  It is a result of inequity, desperation, privilege, and money, among other things.  The thing is, though, that the people who have the shitty luck and the desperation and the poverty often lack a voice.  If they don’t have money for food, shelter, and medicine, then they most likely don’t have money for a computer on which to keep a blog devoted to their side of the adoption journey, or edgy t-shirts with messages like this.

There are times when I am appalled by the blindness of the adoptive parent community.  I am disturbed by the dehumanizing Madonna/whore depiction of “birthmothers” who have carried, birthed, breastfed, loved and cared for their children; the innumerable ways in which APs desperately try to claim every aspect of parenting *including pregnancy* for themselves ( “paper” pregnancies, sonograms of foreign countries, “Born in My Heart!” accessories); and the rewriting of the adoption narrative, transforming it from a complex process of loss and grief to a simplistic act of gift-giving between a grateful “birth” mother and an eager “real” mother.

As an AP I understand that adoption can bring a tremendous amount of joy.  The process itself can be exciting and overwhelming, and sometimes the lack of excitement and understanding from those around us as we are in a long process filled with unknowns leads to overcompensation at the expense of the very same people who make our adoption possible.  I’ll admit it: right here, on this very blog, I once titled a post “Paper Pregnant.”  It was my way (and I think this is very common in AP-land) of indicating that we were waiting, and that our wait was for something very exciting and valid.  Did I intend to hurt the feelings of the women who are pregnant with children that they are placing for adoption?  Of course not.  But it still did not give me the right, especially after I realized the problematic nature of the saying, to use the language.  Along with the other parts of the adoption process- the unknowns, the excitement, and so on- comes the obligation to educate one’s self about all aspects of adoption.  As an adoptive parent I can never stop reading, listening, and learning; it’s part of the job description.  So I learn, I change, and I use the information I gain to be a better parent.

I don’t understand the complete and total lack of perspective that is so widespread in the adoptive parenting community.  I’m baffled by this inability to step into the shoes of another member of the adoption triad for even a moment to consider how hurtful and ugly their “celebration” of adoption can be.  It’s hypocritical for adoptive parents to demand that everyone respect their feelings and their families when they can’t do the same for the first families of their own children.

We don’t celebrate “Gotcha Day” in this house.  In fact, we didn’t really celebrate the anniversary of our adoption.  We acknowledged it, with a fair amount of ambivalence all around.  It some ways it was a happy day last fall when we met Sula and Dawit.  Happy for us, anyways; we got to meet the kids whose pictures we had been staring at for months…and that’s pretty much where the joy stopped.  Dawit remembers feeling excited, but was also nervous and nursing a bad cold.  Sula doesn’t remember, but she was frightened and confused and didn’t want anything to do with us.  Looking back, I guess it probably did feel a whole lot like “Gotcha Day” to Sula, who viewed us as abductors more than parents.  I’m no kiddy snatcher, but if I were, I’m pretty sure that the word I’d utter upon capturing a child would be “Gotcha!”

It’s an ugly word, with ugly connotations, and it- along with all of the other ridiculous phrases that have come to be associated with adoption- should be banned.  Our children may not be able to “hear” the voices of the parents who gave them life, but they can hear ours, and we should not use our powerful voices to denigrate their life histories with fantasies that suit our needs as adoptive parents.

My children are people, not flowers that blossomed or Ethiopian princes and princesses that grew in my heart.  They were not a gift from an impoverished donor to our relatively wealthy family.  They are a blessing to me, but I recognize that this blessing was the result of a tragedy.  I am their Mom, but I share that title with another Mom who also loved them.  This is not a zero-sum game.  We are both “real” mothers.  We both love our children.  Only one of us has a voice.  I will be careful how I use mine.

Noteworthy article: ” One oversease adoptee explains: Parents’ embrace of the ‘home’ culture can have its costs”

In today’s Boston Globe, an essay by Mei-Ling Hopgood entitled “Another country, not my own” explores the delicate balance that adoptive parents must try to strike when seeking to maintain their adopted child’s culture of origin.  To sum it up, back in the days when international adoption was still a fairly new concept in the United States, adoptive parents were encouraged to embrace a “love-is-colorblind” philosophy, and ignored their children’s race and birth culture with the belief that by doing so they were being fair to the child by raising them exactly as they would a child of their “own.”  Years later, a significant population of adult transracial/transcultural/transnational adoptees have been voicing their concerns over that approach.  As it turns out- and you really don’t need to be a PhD candidate in psychology or social work to figure this out- children who grow up shielded from their culture and race are aware of the loss, and the loss is enormous.

But as Hopgood explains, as adoption professionals and adoptive parents scrapped that approach to child-rearing, they embraced the opposite approach, which also has its problems.  Parents can become wrapped up in teaching their kids to “be” Chinese or Korean or Guatemalan- or at least teaching them to be the parent’s *idea* of what it means to be Chinese or Korean or Guatemalan.  Their ideas of these cultures tend to be watered down- throwing ramen noodles in the salad, placing “Asian” decor around the house, wearing Guatemalan jewelry; or frozen in time- having their Chinese daughters dress in traditional clothes and learn about fan dances and tea ceremonies.  This is obviously problematic, just as it was when people ignored their adopted children’s culture altogether.

Obviously, if you read my blog, you’re familiar with my feelings on the subject.  We try to maintain our kids’ Ethiopian culture in a way that is meaningful and real.  I’ve admitted it before, and I’ll say it again:  Adam and I are totally unfit to play Ethiopian Role Models.  But we can do things to facilitate our kids’ comfort and familiarity with their Ethiopian culture and what it means to be Ethiopian.  We can help Dawit keep his Amharic, we can eat Ethiopian food as part of our regular diet, and we can foster relationships with Ethiopian adults.  I commented below the article on the Globe site (I’m sure you can guess which one is mine if you read it) so I won’t get into my whole spiel here, but I truly believe that adoptive parents CAN strike a balance between the love-is-enough and drown-your-kid-in-exoticized-culture approaches to transcultural parenting.

Recipe: Injera Chips

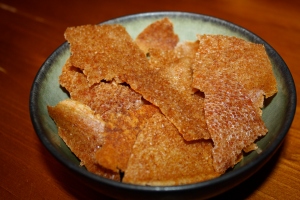
Sour, spicy injera chips

Sour, spicy injera chips

Before we head off for the weekend, I just wanted to share two things.  First of all, check out our kids’ photo, featured over at Anti-Racist Parent under “Gratuitous Cut Kid Pic.”  Second, I haven’t been able to stop thinking about these injera chips that I made the other day.  The recipe was given to me by a woman in our local adoption group who has four older Ethiopian kids.  I couldn’t believe how easy they were (they’re nearly impossible to screw up) and it’s a fantastic way to use up injera that is starting to get old.  I literally can’t make them fast enough to keep up with demand.

You will need:

-berbere
-oil
-injera

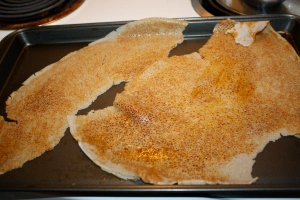
Preheat the oven to 275°.  In a small bowl, combine the oil and berbere in proportions to your liking.  We bought some berbere recently that isn’t particularly hot, so I added at least a tablespoon for every quarter-cup of oil.  Tear a piece of injera in half and arrange it on one baking sheet as shown, and then do the same on a second baking sheet.

This doesn't look very appetizing...but I promise, it comes out great!

This doesn't look very appetizing...but I promise, it comes out great!

Using a pastry brush, spread the oil and berbere mixture onto the injera.  Bake for about 60 minutes (more for really crispy, crunchy chips, less for chewier chips) and allow to cool before breaking into chips.  Repeat.  In the future, I’m planning on getting even more creative with these chips and adding ginger or garlic or other Ethiopian spices.  Yum.

Be a tightwad and make your own yogurt

I saw this article in the New York Times a couple months back about making one’s own yogurt and I have to admit that my first thought was *WHY*?  Why would you do something so silly when you can just BUY yogurt everywhere?  But then I saw this article in Slate comparing cost and time effectiveness of homemade versus storebought versions of several basic foods, including yogurt.  My curiosity was piqued when I noted the cost comparison the Slate tester offered: $1.75 for a quart of “ambrosial” yogurt made from scratch, compared to at least $2.50 for an “insipid” factory-produced quart.  All three of my kids love and eat yogurt every day, and we were spending a ridiculous amount of money on yogurt.  So utterly ridiculous that I can’t even admit the total here.  But let’s just say that my little ones’ fondness for the low-sugar organic Stonyfield farms six packs of teeny-tiny yogurts was costing us a pretty penny.   And I didn’t like giving Dawit (or Bo and Sula) the regular kind, either, because it is just loaded with sugar.  It was time to try something new.

But before I get into that, I want to make acknowledge Barbara Ehrenreich’s latest piece in the New York Times, “Too Poor To Make the News.”  Ehrenreich (author of Nickel and Dimed– read it if you haven’t already) notes the latest media trend of focusing on the “hardships” faced by the middle and upper classes in this current economic climate- people forced to give up their private jets, their private Pilates classes, or their evenings out at Applebees.  While it’s all fine and good for those of us in the middle to pinch pennies by growing our own tomatoes or making our own yogurt, it’s not exactly the same thing as living in a one-bedroom apartment with five other family members and subsisting on squirrel and raccoon for dinner.  The media ignores those stories and in general, the people who live them, choosing to focus on hipsters riding their bicycles to work or housewives baking their own bread to save a few dollars here and there.  I just want to acknowledge those folks living around us in this country who would love to have the problem of stressing about buying organic yogurt for their kids.  I’m grateful that I can sit here and muse about the benefits of homemade yogurt instead of worrying about where our next meal will come from- and I don’t want to make it seem like we have been spared from serious hardship by taking measures like this when in fact our relatively “easy” lives have been made possible by a variety of social, educational, and racial privilege.

Anyways…onto the yogurt.  I was so suspicious of the idea of making yogurt because I had just never even known that it was something you could do yourself.  If you look at a yogurt container, it always lists ingredients that I would never mess with at home- stabilizers or pectin or preservatives.  As it turns out, the ingredients of homemade yogurt are….drumroll please…milk and yogurt (for starter bacteria).  That’s it.  As Jennifer Reese wrote in the Slate article, “The first time I watched this metamorphosis, I felt like a sorcerer.”  It is AMAZING.  And the taste is so much better than regular yogurt- smooth, with no tangy sour taste that needs to be covered up with sugars and flavoring.

Here’s what you need:
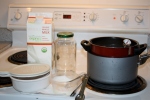
Yogurt supplies

Yogurt supplies

One quart of milk: I use whole, organic milk, purchased at BJ’s for $3.19/half gallon.  I’ve made it with regular whole milk before and was not quite as pleased with the results, but if you live somewhere where you can’t get organic milk for a reasonable price, buy regular instead.  I haven’t tried it with lowfat milk and probably won’t because we like the whole milk variety for its thickness, but if you poke around online, you’ll find that others do it with lowfat.
Two tablespoons of plain yogurt like Dannon All Natural.  After you make it once, you can use your own yogurt as the starter if you’re not an idiot like me who forgets to set some aside before adding flavoring.
A thermometer: I use one that I had for making steamed milk for lattes, but any candy/ meat/ cooking thermometer that measures between 100 and 190 farenheit will do.
A double broiler: don’t overthink this if you don’t have one.  Any pot that fits in another pot (as pictured) will do.
Glass or ceramic jars or containers with lids to put the yogurt into while it sets.  You can put it into plastic/Tupperware after it’s finished, but in general I’ve been staying away from heating plastic with food so while the yogurt is kept warm I use a glass tomato sauce jar and a ceramic dish with a lid.
Flavorings: I’ve used jam, honey, maple syrup, and vanilla in a variety of combinations.  Next time I might try chocolate syrup.  Be creative!

Preparing the yogurt:
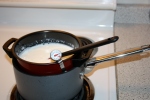
Heating the milk on the stove

Heating the milk on the stove

-Begin by taking your “starter” yogurt out of the fridge and letting 2 tbsp. of it sit on the counter to warm up.  Adding hot milk to cold yogurt can do some funny things to the texture.

-Bring water to boil in your larger pan and turn it to medium/high.  Pour four cups of milk into the smaller pot and place it into the larger pot. Be sure to put in your thermometer to keep track of the temperature (it needs to get to 180-190 degrees).

-While the milk is heating, set up a shallow “ice bath” in your sink.  If you don’t have ice, just cold water is fine.  You’ll use it to cool down the milk more quickly later on.  If you want to, you can skip this step and let the milk cool down on its own, but I do this to save time.

-Turn on your oven to “warm”.  When it gets there, turn it off and open the door to let some of the heat out.  This is where the milk will be sitting for the next few hours.
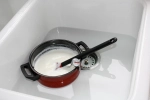
Milk in cold water bath

Milk in cold water bath

-As the milk heats up, stir as you wait for it to reach 180-190 degrees.  When it gets there, remove the milk from the heat and place the pan in the cold water bath as shown.  The milk needs to be at 120 degrees or less before you put it into the jars.

Mixing the starter with the warm milk

Mixing the starter with the warm milk

-When the milk has cooled to 120 degrees, add a few spoonfuls to the starter yogurt and mix thoroughly.  I do this in a bowl with a spout and then add the rest of the milk so that it pours into the jars more easily, but it really doesn’t matter what you do it in as long as you do it separately from the rest of the milk.

-Pour the milk (that has now been combined with the starter yogurt) into the jars or containers you will be using and put on the lids.

The yogurt bundled up in the oven.

The yogurt bundled up in the oven.

-After your milk is in the jars, wrap them in towels and place in the oven with the light on.  The yogurt needs to be kept warm (BUT NOT HOT) for the next five or so hours.

-Now for the hard part: just leave the yogurt alone.  I always want to peek, or tilt the jar around to see if it’s firmed up yet.  Don’t do it- it can mess up the texture of the yogurt or make it take longer.  If you want to check, open up the oven and touch the jar just to make sure it’s still warm.

-I leave it for about five to six hours.  When it’s ready, there should be a liquid layer that has separated from the yogurt (and don’t be alarmed if it’s yellowish-green, it’s just whey).  Drain that and either leave the yogurt in the jars or spoon it into different containers you want to keep it in for serving.  SET SOME ASIDE AS A STARTER FOR YOUR NEXT BATCH NOW before adding flavoring.  Otherwise, you have to buy another container of plain yogurt as starter the next time you make it.

-If you want, add flavoring.  The yogurt is naturally much, much sweeter than storebought so make sure you try it before you start messing around with it.  Since it doesn’t have the mouth-puckering sourness of regular yogurt, you need very little maple syrup, honey, jam, sugar, etc. to sweeten it.

-Refrigerate before eating.

At $3.19 for a half gallon of milk, this works out to $1.60 for a quart (4 cups) of the most amazing, organic yogurt that you have ever tasted (not counting the pennies it costs to add some jam or honey to it).  That’s $.40/cup.  Compare that to the $4.69 our local grocery store charges (it’s slightly less at Trader Joe’s, but they only carry one variety) for the six-pack of 4 ounce Stonyfield Farms YoBaby organic yogurt, which is the equivalent of $1.56/cup, almost four times as expensive as the homemade.  Plus, by having the kids pitch in to help make it, I’ve gotten them super enthusiastic about eating it.  Bonus.

Do not go gentle into that good night

Feel free to skip this post, as it will be entirely depressing and grief-filled and unrelated to Ethiopia or adoption or my family.

******

…Wild men who caught and sang the sun in flight,
And learn, too late, they grieved it on its way,
Do not go gentle into that good night…

-Dylan Thompson

Two weeks ago I was napping with Bo and dreamt of a person I knew ten years ago.  An acquaintance, someone who I had not seen nor thought about in almost exactly a decade.  In the dream, we expressed surprise at seeing one another again, just as we would have in real life.  He told me, with twinkling eyes that acknowledged my surprise, that he had a son.  I knew, even though it was a dream, that this was not right.  From what I knew of him ten years ago, he was not someone who would delight in fatherhood.  The dream was so startling that I woke up and quietly snuck downstairs to search for him on the internet.  I couldn’t remember his last name, but between his uniquely-spelled first name and a few other details, I found him.  But not on Facebook or myspace or any of those other places you look when seeking out someone from your past.  Instead of stumbling across a profile listing favorite singers and tv shows and his current relationship status, I found his obituary, along with a virtual mortuary guestbook filled with grief-ridden messages from his mother.  He died four years ago in a car accident.

The next day as I went to nap with Bo, I clutched him tightly and sobbed into his bony shoulders, haunted by the knowledge of the anguish experienced by the mother who loved and missed her son so much that she continued to write messages to him, begging for some sign that he was listening, watching, present.  Frightened by my sudden display of grief, Bo asked what was wrong with me.   He smiled cautiously as I told him that I was crying because I just loved him SO MUCH.

A week later, celebrating Mother’s Day with my family, my sister delivered the sobering news of a former classmate’s death.  Of a heroin overdose.  A guy who I knew from school, and parties; a former friend’s ex-boyfriend.  I remember the day that we skipped school together with mutual friends and drove too fast on the highway, racing in separate cars at 120 miles an hour.  He was someone that I didn’t keep in touch with but whom I fully expected to go out into the world, get a decent job, get married and have a couple of kids.  He was in a relationship with another classmate, he had a solid job, but for some reason, was playing a dangerous game that he ultimately lost.

Fortunately, I am somewhat numb to these losses.  I’ve been innoculated by the previous deaths of five other classmates and acquaintances.  All boys, their souls yanked suddenly from this earth via motor vehicle accidents or drugs.  The first time was hard- two friends at once, in the same accident.  Confronted by death suddenly when the phone rang insistently at dawn, informing me that my belief that my friends and I would have many happy years together shattered.  Friends die.  Even when they’re young.  I learned to accept that.  I wearily heard the news time and time again, accepting reality more quickly and with less grief with each successive passing.

And yet this time I have been in a funk that I can’t seem to shake.  Of all the people I know who passed away, the two that I wrote about were not particularly close to me.  But their deaths do matter, so much, to those who were close to them.  They left behind mothers and girlfriends and siblings and relatives.  None of these boys or men fought hard enough to prevent the grief they have dealt their families and loved ones.  They lived reckless lives and their families suffer.  And yet I cannot be angry with them.  They’re dead.  I’ll never see them again, even if I wanted to.

Recipe: Timatim Salad, Timatim Firfir

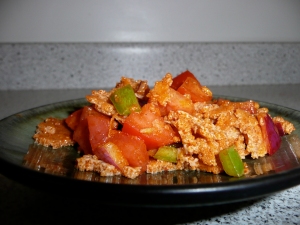
Timatim firfir

Timatim firfir

This is by far one of our favorite Ethiopian dishes.  We first tried the Timatim Salad last year before our kids came home at a restaurant and loved it.  I immediately tried to find a recipe and came across this.  It was very similar to what we had at the restaurant.  If you want, you can stop here and just use that recipe.

There are two versions of this recipe.  Timatim firfir includes broken up pieces of injera- that’s why it’s called firfir.  The other recipe is the same, but minus the injera- so if you don’t have easy access to an Ethiopian grocery store, just go ahead and make the timatim salad .  Berbere and jalapeño peppers are key ingredients, so no matter how much you use, the salad will have at least a little bit of a kick to it.  But the salad is very flexible and you can alter the proportions to suit your own tastes.  The funny thing is that I actually hate (yes, hate) onions and peppers.  And yet every time I make this recipe, I find myself standing in front of the open refrigerator late at night, devouring the salad straight from the bowl.

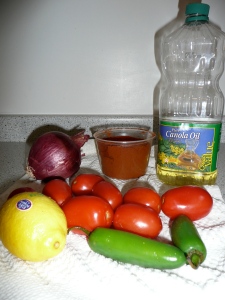
ingredients

Dressing:

1/4 c. canola oil
3 tbsp. vinegar or wine (I’ve used white vinegar, red wine vinegar, white wine, really old leftover white wine…the recipe is forgiving.  Use what you have!)
Juice of one lemon (about 2-3 tbsp. bottled juice)
1-2 cloves garlic, minced
2 tsp. berbere (I use more, but we like it very hot)

Salad:

3-4 large tomatoes (or any other kind of tomatoes you have)
1/2- 1 onion, finely chopped
1-2 jalapeño peppers, chopped and if desired, de-seeded for less heat
2 pieces injera, torn into bite-size pieces

Combine the ingredients for the dressing and pour over the chopped vegetables (and injera, if making the timatim firfir).  Serve chilled.  Or just eat it the way it is and don’t tell anyone you made it so you don’t have to share.  Whatever works for you… 🙂

Recipe: Gomen (Collard Greens)


Before trying gomen for the first time at an Ethiopian restaurant, I don’t think I had ever eaten collard greens before in my life. I don’t know why- I’m a longtime vegetarian who is unafraid of trying all sorts of more adventurous greens, like kale or swiss chard- but I sure was missing out. To me, gomen is a must-have when I make several Ethiopian stews for dinner. Having a healthy green really seems to balance it all out, taste-wise and nutritionally.

This is a recipe that I have to admit I’ve sort of come up with on my own. By using recipes online, asking Kiddy for her ingredient list and using her cooking methods, and memorizing the flavors from several Ethiopian restaurants, I experimented and came up with the following. Adam thinks it tastes even better than the kind we get at one of our favorite restaurants, and Dawit gets a look of pure delight on his face when he sees me pulling out a big bag of greens as I put away the groceries, so I think the recipe’s a hit. I almost always supersize the recipe to ensure that I get a taste 🙂

On a side note: some Eth. restaurants use spinach instead of collard greens. It tastes good, but Dawit was unfamiliar with spinach when he came to America and I suspect that the substitution is an Americanization and not “authentic.” Stick with the collard greens if you have them at your local grocery store.

Recipe: Gomen

2 bunches of collard greens
1 large onion, chopped
1/3+ c. canola oil (replace some of the oil with niter kibbeh or butter if desired)
minced garlic and ginger (about 2-3 tsp. each, would be my guess. If you’ve read my other recipes, you know how this works)
2 jalapeño peppers, de-seeded and chopped
salt, to taste

Pull off the leaves of the collard greens and discard the stems. Tear the leaves into medium-sized pieces (just small enough to get them into the pot for cooking- you’ll chop them into smaller pieces later) and wash them well under cold water. Bring a large stockpot of salted water to boil and add the greens. Cook for about 10-15 minutes- the greens should change color and soften. Drain in a large colander and rinse with cold water. Squeeze out all of the excess moisture and chop into small pieces. Set aside.

Cook the onions on medium heat until they start to soften and turn translucent, about seven minutes. Add the oil/niter kibbeh/butter and cook for several minutes. Then add the garlic, ginger, and jalapeños and saute for several more minutes. Add the chopped greens and stir well, ensuring that the greens are thoroughly mixed in with the other ingredients. Add salt and cook on medium-low until the greens have soaked in the flavor.

Recipe: Fossolia

Fossolia is a delicious green bean dish. Like many other Ethiopian dishes, there are countless ways to prepare them. Kiddy’s version has a strong tomato flavor, giving it an almost Italian essence. I don’t know if I’ll admit it to her, but I ended up eating the leftovers over pasta and thought it went together perfectly. It’s very easy to make and doesn’t require any special hard-to-find Ethiopian spices, so it’s an ideal recipe to start with if you are new to Ethiopian cooking.

Fossolia

2 onions, chopped
1/3 c. canola oil
3-4 oz. tomato paste (about 1/2 of a 6 oz. can)
4 cups green beans, ends snapped off and cut or snapped into halves or thirds
3 carrots, cut into stick-shaped pieces
2-3 tomatoes, chopped
minced ginger and garlic (as much or as little as you’d like- I use about 2 tsp. each)
salt, to taste

Start by cooking the onions on medium heat for about seven minutes, or until the onions begin to turn translucent and soften. Add the oil and continue cooking for several more minutes. Stir in the tomato paste and allow several minutes for the ingredients to simmer together. Add the green beans and carrots, stir well, and cover. Continue cooking on medium heat for 10-15 minutes, then add the tomato, ginger, garlic, and salt, and simmer until all of the vegetables are tender.

Recipe: Missir Wat

Missir wat is a hearty lentil dish with a rich berbere flavor. This is a great dish to bring along to a potluck or family gathering. It’s a nice introduction for newcomers to Ethiopian cooking, easily doubles for a large crowd, and is one of the easiest recipes to make. And at around $3 per batch, it’s inexpensive. You can turn the heat up or down by adjusting the amount of berbere to your liking. I make it pretty spicy because that’s our family’s preference (even at age 2, Sula can take it like a champ!) but if you aren’t too keen on heat, definitely limit the berbere to a tablespoon or so the first time you make it. The recipe below could easily feed six. Before starting, take a look at this post that explains the basics of Ethiopian cooking- much of it applies to a recipe like this.

3 onions, chopped
1/2 c. oil
2-3 tbsp. berbere
1/2 14 oz. can diced tomatoes
3 c. water, plus extra on hand
2 c. split red lentils, rinsed well
minced ginger and garlic (about 1 tbsp. each)
salt to taste

In a large stock pot, cook the onions on medium/medium-high heat for several minutes, stirring frequently, until they begin to soften and turn translucent. Add the oil and cook for a few more minutes before adding the berbere. Add the berbere and allow the ingredients to simmer together for several minutes (berbere should always have plenty of time to cook before other ingredients are added- Kiddy told me about a word,”kulait,” for a sort of uncooked/raw flavor of berbere that wasn’t allowed to cook through all the way. I know what she means and it’s important to avoid it). Add the tomatoes and several spoonfuls of the tomato juice and stir. Then add three cups of water and bring to a boil. Add the rinsed lentils and stir to combine all the ingredients. Turn the heat to low-medium and simmer, but keep a close eye on the lentils- if the liquid has been absorbed before the lentils have softened, add more water as needed and continue cooking on low heat. Add the ginger and garlic and salt, stir well, and continue simmering until the lentils are completely tender.